
Welcome to Skater manual
Skater is the Best .NET Obfuscator, easy-to-use .NET assembly protecting tool.

Code obfuscation is a form of software protection against unauthorized reverse-engineering.
The chief functions of any software protection technique can be determined as detection of pirate attempts to decipher or tamper software, protection against such attempts and alteration of software to ensure that it functionality degrades in an undetectable manner if the protection fails.
- Skater .NET Obfuscator is the Windows based graphical tool that implements all known software protection techniques and obfuscation algorithms. Skater is an intuitive .NET Obfuscator, allows .NET developer quickly and reliably protect .NET products. Skater obfuscator is a universal .NET Obfuscator that could be used as a console executable as well.
- If you would like periodically obfuscate your .NET products the Skater .NET Obfuscator is for you. Rustemsoft LLC is using the Skater for internal needs securing all Rustemsoft LLC .NET executables and assemblies. Its command-line version running in batch mode is much useful for your scheduled products updates. You have to assign settings for an assembly in GUI version first. Then the batch obfuscate task will use the settings.
-
Main features of Skater .NET Obfuscator to handle common .NET obfuscation tasks:
- Prohibits reverse engineering
- Obfuscated application usually is not recompilable
- Processes any .NET application, executable or assembly
- Encrypts string constants
- Compatible with any .NET framework from 1.0 through 4.8. It supports latest .NET 6
- Control flow obfuscation stops decompilers and deobfuscators
- Scrambles class names, method names, field names etc.
- Protects XAML (baml) files in WPF application
- It works well on both (x86 and x64) platforms
- Provides .NET Licensing features
- Implements .NET Code Extension for small .NET applications protection
- Implements assemblies linking; linkage unites .NET assemblies into a single dll or exe
-
You need the Skater .NET Obfuscator for the following reasons:
- You have a clear understanding of obfuscation benefits and appropriate use cases.
- You generally understand that obfuscation prevents source code extraction.
- You have practical understanding of how and when obfuscation should be used.
- Also your organization has a consistent approach to assessing the risk of source code extraction.
Authoring requirements
Skater is designed for 32-bit and 64-bit operating systems and works under the Microsoft® .NET and .NET Framework.
-
The Skater .NET Obfuscator runs on:
- Microsoft Windows NT® 4.0
- Microsoft Windows 2000 (SP2 Recommended)
- Microsoft Windows XP Professional
- Microsoft Windows 7 family
- Microsoft Windows 8.1 family
- Microsoft Windows 10 family
- Microsoft Windows 11 family
(Windows 95/98/ME and Windows 3.1 systems are not supported)
To author with Skater, your system should be equipped with the following:
-
Latest OS:
Make sure you are running the latest version of either Windows 7 SP1, Windows 8.1 Update, or Windows 10/11.
-
Processor:
1 gigahertz (GHz) or faster processor or SoC
-
RAM:
1 gigabyte (GB) for 32-bit or 2 GB for 64-bit
-
Hard disk space:
16 GB for 32-bit OS, 20 GB for 64-bit OS
-
Graphics card:
N/A
-
Display:
800x600
License Agreement
Before installing Rustemsoft LLC Skater .NET Obfuscator please read carefully terms and conditions of this agreement.
You will express your consent to be bound by the terms of this Agreement by obtaining or opening Software media package. If you do not agree to all terms of this agreement do not use Software and destroy all copies of Software from your computer.
Grant of license:
Rustemsoft LLC (the Developer) grants you (the Customer) a worldwide, non-exclusive, non-transferable, personal license to install and use the accompanying Skater .NET Obfuscator (the Software) in the manner provided herein.
- Software is licensed, not sold. Software is protected by copyright law, international copyright treaty provisions and other intellectual property laws and treaties. Customer must not allow copies of Software or any part of it to be made or distributed to anyone else. Customer may make backup copies of Software for archival purposes only.
- Software is licensed for use on a single computer. Customer may delete Software from one computer and reinstall it on another, but Customer may not install Software on more than one computer at any given time without Developer's prior written permission.
- Software may not be rented, leased, nor in any other manner commercially exploited without Developer's prior written permission.
- Developer makes no representations or warranties about the suitability of this Software for any purpose. Software is provided 'as is' without express or implied warranties, including warranties of merchantability and fitness for a particular purpose or non-infringement. Developer may not issue updates to this Software.
- All assemblies/executables accessed and/or modified through Software is the property of the applicable content owner and may be protected by applicable copyright law. This license gives Customer no rights to such content, and Developer disclaims any liability for misuse of assemblies/executables.
- Title, ownership rights, and intellectual property rights in and to Software shall remain with Developer. Customer agrees not to modify Software or attempt to decipher, disassemble, decompile or reverse engineer Software. Reproduction and/or redistribution of any portion of Software is prohibited without Developer's prior written permission.
- Developer may terminate this license at any time by delivering notice to Customer and Customer may terminate this license at any time by destroying or erasing Customer's copy of Software. Upon termination of this license, Customer agrees to destroy all copies of Software. In case of termination sections 4 through 10 of this agreement shall indefinitely survive its termination. This license is the complete statement of the agreement between Developer and Customer and merges and supersedes all other or prior understandings, purchase orders, agreements and arrangements.
- Developer or its suppliers shall not be liable for direct, incidental, consequential, special or indirect damages of any sort whatsoever. This includes loss of business profits, revenues, information, or business interruption resulting from Customer's use of Software or inability to use Software, even if Developer has been informed of the possibility of such damages.
- This Software is not fault-tolerant. It is not designed, manufactured or intended for use in hazardous environments requiring fail-safe performance. Developer and its suppliers specifically disclaim any express or implied warranty of fitness for high-risk activities.
- Developer reserves the right to discontinue distribution and/or support of its products at any time without notice. Developer reserves the right to change the prices of its products and services at any time without notice.
Complete agreement:
This Agreement is the entire agreement between you and Developer relating to its subject matter. This Agreement may not be modified other than in writing executed by Rustemsoft LLC.
Getting started
Run Skater. The tool has 3 main buttons: "Open", "Save Settings", and "Obfuscate".

Open your .NET assembly by using "Open" dialog box. On the Info Tab page you able to browse main assembly properties and the assembly structure as well.
Adjust your assembly obfuscation preferences by using all of presented tab pages.
Click the "Save Settings" button to store the obfuscation settings as the preferred settings to be used when opening this assembly next time when you will use Skater again.
Also the stored Settings may be used for command-line obfuscation in batch MS-DOS mode. Learn more about Skater console usage.
If you have saved pre-stored Settings just click F3 button and select from pop-up list an assembly you would like to open for obfuscation. It will populate the assembly into Skater interface with all previously stored specific preferences.
Push "Obfuscate" button (or F5). The time spending for obfuscation is proportionate to your assembly size and how hard are your obfuscation settings.
Main Skater window
The Skater main window is split into several tab pages. The first page is Info Tab page. By using the page you able to browse main assembly properties and the assembly structure as well.

Click once on the plus or minus icon next to a member node in the Assembly Structure tree. This action expands or collapses the member node. If no plus or minus icons appear next to a node, it means that the member node holds no objects extending beyond the level of that node.
You can see brief description of selected member in Status bar.
Command-line Interface
Obfuscator console usage
Obviously command line automation is the premium feature. The console interface could be useful in two different ways.
1. with pre-stored obfuscation settings (a preferable way):
Skater [SettingsName]'SettingsName' is a name of pre-stored Settings.
The command-line version running in batch mode is much useful for your scheduled products updates. You have to assign settings for an assembly in Graphical User Interface (GUI) version first. Then the batch obfuscate task will use the settings.
Also you can use assembly obfuscation settings stored in a separate xml file per assembly.
The Skater has two ways to store configuration information for assemblies.
You can call obfuscation settings by the settings name as shown above. Also the obfuscation preferences could be stored per project in the .NET project folder in a separate xml configuration file.
-XMLFILE=[Path+FileName] Pre-stored Settings XML File Name with full pathExample:
Skater -x=C:/MyDir/MyAssemblySettings.xmlIn GUI you can call the xml pre-stored settings to apply in Skater interface by Ctrl+F3 ('Apply XML file Settings') key combination. The settings XML configuration file could be connected with your .NET project, is easily to backup, can be checked out with the project, can be shared between several users or taken to another development machine as a part of obtaining the .NET project source code from the source code repository.
Learn how to assign and save Assembly Settings by using GUI version.
2. The command-line interface
When you run Skater.exe in console MS-DOS mode it accepts the following command-line parameters:
-XMLFILE=[Path+FileName] Pre-stored Settings XML File Name with full path
-SOURCE=[Path+FileName] Source Assembly Name with full path
-OUTPUT=[Path] Target Assembly output directory path
-KEY=[Path+FileName] Key file name with full path for strong-named assemblies
-METHOD=[Number] Naming convention method. 'Number' is:
-
0- '?' chars (default when registered)
-
1- Unreadable chars
-
2- Alpha-Numeric chars
-
3- Abracadabrical names (64 chars)
-ALLPRIVATE Obfuscate all private members (it does not obfuscate private members by default)-PUBLIC Obfuscate all public members (it does not obfuscate public members by default)-CONCEALSTRINGS Conceal all System.String values (it does not encrypt String values by default)-FLOW Implement Control Flow for All methods-WRITELOG Write Error Log file with info if Skater fails (Skater.err log file will be created in -OUTPUT directory)-HIDE Hide the console window when process runs-? Display the usage message
Option key is '-', options are recognized by a first character
Examples:
Skater MyAssemblySettings
Obfuscate by using Settings created in GUI
Skater -s=C:/MyDir/MyAssembly.dll -o=C:/Dir_New/ -k=C:/MyKey.key -a -p
The MyAssembly.dll that located in C:/MyDir/ will be stored into C:/Dir_New/ directory after obfuscation. Since the assembly is strong-named it will be signed with C:/MyKey.key.
The process will implement all private and all public members obfuscation.
Please note, when use Skater command-line interface the console command has to conform with MS-DOS commands rules. When you specify a parameter it should NOT have spaces.
If it does include spaces the passing argument must be surrounded with double quotes:
"C:\Program Files (x86)\FolderName\Skater.exe"
Note You can run Skater as a single process at your PC. Please do not run the command-line interface while the Skater GUI is open. It will not start.
Options Tab
Global options can be specified on Options tab-page to control the obfuscation process.

Use "Naming Convention" radio-buttons, to define how your assembly members will be renamed. Private and Public members names obfuscation scrambles names of classes, methods, variables, and other assembly members. It makes assembly code reverse engineering much harder by obfuscating names. Applying for "'?' characters" allows you generated names that will prevent recompilation.
Sign input assemblies with the specified key file. When your assembly has been already strong name signed, the obfuscated assembly will be re-signed automatically with the original keyfile. Just make sure that your key file is in the correct path specified in "Path to Key file" box and Skater obfuscator will automatically re-sign the modified assembly with the same key file. If you do not have access to the key file, you can choose to delay sign the protected assembly, or choose to remove the signature, so you can continue to work with the obfuscated code.
By using the Options interface you can choose to obfuscate all private members or select some specific private members group: classes, methods, and/or fields only.
Also the interface gives you ability to apply one of the three presented Obfuscation Scenario.
You set variables in MySettings or Properties namespace
When your .NET application built under .NET framework 2.0 or later there is a special system namespace added into your project. The namespace has the name 'MySettings' for VB.NET and 'Properties' for C#. You can create and name global variables/properties in this namespace and use them in all your project scope. Once you have your project loaded, you can go to the 'Project' menu and select the 'Properties' option from the list. Then select the "Settings" Tab item. You will then see the settings grid which is used to configure the application settings.
The main problem for obfuscation the application properties settings should not be renamed since the properties names are stored in your project MSIL script as string values. Then .NET framework compiles the names at the application run-time. If the names are obfuscated .NET framework does not figure out the mangled names during the post-built compilation and fails. Please check the "You set variables in MySettings or Properties namespace" checkbox on 'Oprtions' tab-page if you set up the project settings. Skater .NET Obfuscator will not rename the properties in the namespace.
Create Renaming XML map-file (original names vs. new names)
Skater writes the special renaming map file in XML format which lists all of the renaming that has been done during an obfuscation process, listing the original name and the new name. This is helpful in a support situation where we have an exception call stack to analyze but we can not tell what the original member functions were called that appear in the stack trace.
Obfuscate Public Members
Private and Public members names obfuscation scrambles names of classes, methods, variables, and other assembly members. It makes assembly code reverse engineering much harder by obfuscating names. Some Skater settings allow to generated names that will prevent recompilation.
Public members in dll libraries are advisedly reserved from obfuscation because they are intended to be used in external assembly code. If you are sure some of Public members are not to be accessed from outside, you may want to obfuscate them.
For exe executables you may consider the assemblies to be self-contained, and set obfuscation of all possible names very aggressively, including Public members.
The Public members tab-page is split into two panes. By using the page you able to browse Public members in the assembly structure and select/deselect them for obfuscation process.
The right section gives you ability to adjust some specific settings. The left section of the tab-page interface shows you structure of your assembly. You can easily change the appearance of panes.
The left section displays a hierarchical view of your assembly structure in a tree-like structure. This Tree is regarded as an object with several objects inside it, representing assembly classes, methods, fields, and others. Check some particular Public member and it will be obfuscated.

Check/uncheck checkboxes in right pane. It will select/deselect corresponding Public members groups to include them into obfuscation process.
Skater enables you to resize each of two panes by using special center splitter. When you pass the mouse pointer over the central vertical edge, the cursor changes to indicate that the both panes can be resized.
Click once on the plus or minus icon next to a member node in the left pane tree. This action expands or collapses the member node. If no plus or minus icons appear next to a node, it means that the member node holds no objects extending beyond the level of that node.
You can see brief description of selected member in Status bar.
Benefits of names obfuscation
As an example we will create a simple command-line application and then obfuscate it. The following console programs are the C# and VB.NET (some guys still code in VB.NET) version of the "Hello World!" program, which displays the string "Hello World!" Actually it is not the traditional "Hello World!" and it displays in addition today's date and current time. We have added couple of private variables to see what happen when we obfuscate them.
|
C#
using System; struct Module1 { private string str = "Hello World! Today is:"; private System.DateTime today = Now; void Main() { Console.WriteLine(str + System.Convert.ToString(today)); } } |
|
|
VB .NET
Imports System Module Module1 Private str As String = "Hello World! Today is:" Private today As Date = Now Sub Main() Console.WriteLine(str + CStr(today)) End Sub End Module |
You can see four highlighted members' names. Two are private variables' names today and str. Module1 is name of the class. Main is name of method that is single method in the simple class. Now we are ready to compile the simple code in .NET environment. We may get ConsoleApplication1.exe executable file as a result of compilation. What is inside in the executable? Why do people say we need to hide our .NET stuff? The .NET Framework SDK ships with a disassembler utility called ILDasm that allows you to decompile .NET assemblies into IL (Intermediate Language) Assembly Language statements. To decompile the ConsoleApplication1.exe file start ILDasm on the command line. Take a look what we got after the decompilation:
|
IL
.class private auto ansi sealed beforefieldinit Module1 extends [mscorlib]System.Object { .custom instance void [Microsoft.VisualBasic]Microsoft.VisualBasic.CompilerServices. StandardModuleAttribute::.ctor() = ( 01 00 00 00 ) .field private static string str .field private static valuetype [mscorlib]System.DateTime today .method private specialname rtspecialname static void .cctor() cil managed { .maxstack 8 IL_0000: ldstr "Hello World! Today is:"
IL_0005: stsfld string ConsoleApplication1.Module1::str
IL_000a: call valuetype [mscorlib]System.DateTime [Microsoft.VisualBasic]Microsoft.
VisualBasic.DateAndTime::get_Now() IL_000f: stsfld valuetype [mscorlib]System.DateTime ConsoleApplication1.Module1::today
IL_0014: nop
IL_0015: ret
} // end of method Module1::.cctor .method public static void Main() cil managed { .entrypoint .custom instance void [mscorlib]System.STAThreadAttribute::.ctor() = ( 01 00 00 00 ) .maxstack 8 IL_0000: nop
IL_0001: ldsfld string ConsoleApplication1.Module1::str
IL_0006: ldsfld valuetype [mscorlib]System.DateTime ConsoleApplication1.Module1::today
IL_000b: call string [Microsoft.VisualBasic]Microsoft.VisualBasic.CompilerServices.StringType::
FromDate(valuetype [mscorlib]System.DateTime) IL_0010: call string [mscorlib]System.String::Concat(string,
string) IL_0015: call void [mscorlib]System.Console::WriteLine(string)
IL_001a: nop
IL_001b: nop
IL_001c: ret
} // end of method Module1::Main } // end of class Module1 |
Everything looks pretty obvious and understandable in the IL script. Is not it? Right, it is hard to figure out the IL code for us more mortals. So if you are now guessing your .NET source code will be accessible only to a small circle of technical folks who actually know IL Assembly Language, think again. You can take this step further and actually recreate the source code by using some much sophisticated decompilers. These decompilation tools can decompile a .NET assembly directly back to a high level language like C#, VB .NET, or C++. Ok, we are ready to obfuscate the sample ConsoleApplication1.exe executable by using Skater .NET Obfuscator. Open the exe file in Skater Obfuscator. In the Obfuscator interface go to Options tab and select 'Alpha-Numeric characters' under 'Naming Conventions'. Choose all Private and all Public members obfuscation mode. When you run the obfuscated ConsoleApplication1.exe it produces the same result. Take a look what changed inside the simple program. We need to run the ILDasm.exe again against the new obfuscated executable and it will give us the following IL script:
IL
IL_0000: ldstr "Hello World! Today is:"
IL_0005: stsfld string ConsoleApplication1.'0AAAA'::'1AAA0'
IL_000a: call valuetype [mscorlib]System.DateTime [Microsoft.VisualBasic]Microsoft.
IL_000f: stsfld valuetype [mscorlib]System.DateTime ConsoleApplication1.'0AAAA'::'2AAAA'
IL_0014: nop
IL_0015: ret
IL_0000: nop
IL_0001: ldsfld string ConsoleApplication1.'0AAAA'::'1AAA0'
IL_0006: ldsfld valuetype [mscorlib]System.DateTime ConsoleApplication1.'0AAAA'::'2AAAA'
IL_000b: call string [Microsoft.VisualBasic]Microsoft.VisualBasic.CompilerServices.StringType::
IL_0010: call string [mscorlib]System.String::Concat(string,
IL_0015: call void [mscorlib]System.Console::WriteLine(string)
IL_001a: nop
IL_001b: nop
IL_001c: ret
|
Skater .NET Obfuscator just replaced member names with alpha-numeric combinations that makes harder to understand the code. However it is not so big trick and every Obfuscator can do that. Everyone can replace the alpha-numeric char combinations with some eye-friendly names. Moreover, by using ILasm.exe (one more .NET Framework SDK assembler utility that allows you to compile IL code back into an executable) we can easily recompile the obfuscated IL output and it will work without problems. Skater .NET Obfuscator can generate a non-recompilable executables. See the IL script below.
IL
IL_0000: ldstr "Hello World! Today is:"
IL_0005: stsfld string ConsoleApplication1.'?'::'?'
IL_000a: call valuetype [mscorlib]System.DateTime [Microsoft.VisualBasic]Microsoft.
IL_000f: stsfld valuetype [mscorlib]System.DateTime ConsoleApplication1.'?'::'?'
IL_0014: nop
IL_0015: ret
IL_0000: nop
IL_0001: ldsfld string ConsoleApplication1.'?'::'?'
IL_0006: ldsfld valuetype [mscorlib]System.DateTime ConsoleApplication1.'?'::'?'
IL_000b: call string [Microsoft.VisualBasic]Microsoft.VisualBasic.CompilerServices.StringType::
IL_0010: call string [mscorlib]System.String::Concat(string,
IL_0015: call void [mscorlib]System.Console::WriteLine(string)
IL_001a: nop
IL_001b: nop
IL_001c: ret
|
Sure, the presented above IL code can not be compiled or the compiled executable will not work well. As you can see all member names has the same single '?' character representation. We can get the result by using Skater .NET Obfuscator special settings. In the Obfuscator interface go to Options tab and select '?' characters under 'Naming Conventions'. The member names obfuscation is the very first essential step of .NET assembly obfuscation. You need to apply other Skater .NET Obfuscator methods and algorithms to better secure your .NET apps.
Strings Encryption
Since Strings can provide useful clues for anyone trying to reverse-engineer your code it makes sense to protect your string data from spying eyes. It will not prevent an absolute hacker from deciphering the conversion and seeing your data. However, for example, an attacker trying to break a licensing routine would first focus attention on Strings having to do with licensing to locate the appropriate spot of code. Skater can make this more difficult by encrypting the strings in your .NET assembly. This is done by inserting a decryption routine into the assembly and calling the decryption code at runtime to return the original Strings.
Strings Protection Special Features
1. Strings are vital code parts. It makes sense to create them in native code. Skater generates a C++ written DLL with the protected Strings.
The new option protects algorithms by coding Strings in native code and store them in a separate machine-code DLL. Native code can be reverse engineered but it is a very tough job. Plus, Strings are encrypt-protected in the DLL.
If you select "Strings Stored in Separate DLL (recommended)" option for this case Skater generates a C++ written DLL that will content the protected Strings. The native-code DLL will be located in the same directory of your output assembly path. Then you need to specify the Separate DLL file name. By default the name is 'appExtension'. You must include the Separate Strings DLL into your product distribution package and install your final assembly together with that DLL file only. Otherwise your .NET assembly will not work. This mechanism is designed to ensure that decompilers cannot see and decipher the output assembly's String objects. It makes String values completely invisible.
2. Skater .NET Obfuscator is using a virtual cloud storage to protect vital parts of source code. It protects your algorithms by storing encrypted Strings into Cloud Vault while preserving the user interface in .NET. Skater extracts String values, encrypts them and then uploads into a virtual Vault. It cannot be reverse engineered since it’s stored on a protected web host. Plus, Strings are encrypt-protected in the Cloud Vault. To see that go to obfuscate the ConsoleApplication1.exe executable again by using Skater .NET Obfuscator. Open the exe file in Skater Obfuscator. But for this time, in the Obfuscator interface go to Strings tab and select 'Strings Stored in protected virtual Cloud Vault' under 'Strings Store Location'.

The Strings tab-page is split into two panes. By using the page you able to browse Strings values in the assembly structure and select/deselect them for obfuscation process.
The right section gives you ability to adjust some specific settings. The left section of the tab-page interface shows you a structure of your assembly. You can easily change the appearance of panes.
The left section displays a hierarchical view of your assembly structure in a tree-like structure. This Tree is regarded as an object with several objects inside it, representing assembly classes, methods, fields, and others. Check some particular String value and it will be encrypted.
Check/uncheck checkboxes in right pane. It will select/deselect corresponding String values groups to include them into obfuscation process.
"Do not obfuscate Strings with length less than" box allows you to specify strings by their lengths with regard to include them into encryption process or not. Let say, you have entered '3' in the box. That means a string 'ab' will not be encrypted regardless of it is selected. Other selected string 'abc' will be encrypted.
You can apply cryptography algorithm for your String values encryption process. For this case you must enter a password for cryptography. The password will be encrypted and stored inside your obfuscated assembly. Also you may choose option when the password will be stored outside of assembly in a separate file. This file needs to be located in the same directory where your assembly will be deployed.
Control Flow Algorithms
Control Flow obfuscation intended to stop decompilers and deobfuscators from functioning correctly.
Control Flow obfuscation hinders reverse engineering by scrambling .NET methods (functions and procedures). The Control Flow algorithm rewrites and reorders IL instructions, inserting decoy branches while preserving program semantics. This process effectively transforms clear method implementations into “spaghetti” code, significantly complicating analysis by humans and decompilers.
Because Control Flow obfuscation adds extra instructions, it increases the size of the output assembly. If you do not require the highest possible level of protection, consider disabling this feature to reduce executable size.
The technique works by decomposing code into fragments and applying a sequence of transformations to those fragments according to the selected obfuscation criteria. The tool (Skater) then reassembles and obfuscates the transformed fragments. Since the transformations are designed to be semantics-preserving, the obfuscated output produces the same runtime behavior as the original code while making reverse engineering and tampering far more difficult.
The Control Flow tab-page is split into two panes. By using the page you able to browse method members in the assembly structure and select/deselect them for Control Flow obfuscation process.
The right section gives you ability to adjust some specific settings. The left section of the tab-page interface shows you a structure of your assembly. You can easily change the appearance of panes.
The left section displays a hierarchical view of your assembly structure in a tree-like structure. This Tree is regarded as an object with several objects inside it, representing assembly classes, methods, fields, and others. Check some particular method member and it will be Control Flow obfuscated.

Check/uncheck checkboxes in right pane. It will select/deselect corresponding methods groups to include them into Control Flow obfuscation process.
There are three Control Flow obfuscation algorithms are presented. You can select one of them.
Skater enables you to resize each of two panes by using special center splitter. When you pass the mouse pointer over the central vertical edge, the cursor changes to indicate that the both panes can be resized.
Click once on the plus or minus icon next to a member node in the left pane tree. This action expands or collapses the member node. If no plus or minus icons appear next to a node, it means that the member node holds no objects extending beyond the level of that node.
You can see brief description of selected member in Status bar.
Vigorous algorithm: guidance and best practices
Use Vigorous sparingly: don’t select all build methods, and test thoroughly since altered control flow may cause unpredictable behavior.
Overview The Vigorous algorithm applies aggressive control-flow transformations to reduce reverse-engineering risk. Because these transformations are deep and structural, they do not require enabling every available build method: selecting all build methods provides little additional protection but greatly increases complexity and the chance of runtime issues.
Recommended configuration
- Do not select all build methods by default. Start with the minimal set of build methods that produce the protection level you need.
- Prefer a staged approach: enable Vigorous on one module or build target first, verify behavior, then expand coverage if necessary.
What changes and why it matters
- Vigorous rewrites method bodies and control-flow graphs; it can introduce non-trivial changes to exception handling, inlining, loop structure, and branch ordering.
- These changes can break assumptions in dependent code (reflection, dynamic invocation, native interop, serialization, debuggers, or profiling tools), and can alter timing-sensitive behavior.
Testing checklist (must do before release)
- Unit tests: run the full unit test suite; focus on tests that exercise exception paths and edge cases.
- Integration tests: validate interactions between modules, third-party libraries, and native code.
- Runtime validation: run the app under realistic load and environments (dev, staging, target OS versions).
- Reflection & serialization: exercise any code paths that rely on
Type.GetMethod, dynamic invocation,Activator.CreateInstance, JSON/XML serializers,DataContractusage, or attribute-driven logic. - Interop & P/Invoke: verify all native calls and marshaling behavior.
- Startup & performance: compare startup times, memory consumption, and hot-path latencies vs. the unobfuscated build.
- Error monitoring: verify logging, crash reporting, and symbol/upload pipelines still work and map to meaningful diagnostics.
- Fuzz / error injection: where practical, fuzz inputs and simulate resource failures to reveal hidden assumptions.
Rollback & mitigation
- Keep an unobfuscated (or minimally obfuscated) build artifact for quick rollback.
- If defects appear, narrow the problem by re-building the failing module without Vigorous, or by selectively disabling specific transformations where supported.
- Maintain feature flags or build variants to isolate problematic components.
Documentation & developer notes
- Record which modules were processed with Vigorous and the exact tool/version/settings used. This metadata is invaluable for debugging and incident response.
- Inform QA and SRE teams when a Vigorous-obfuscated build is deployed to staging so they can prioritize targeted checks.
Cautionary statement Applying Vigorous increases the risk of subtle bugs and unpredictable behavior. Use it deliberately: apply changes incrementally, validate comprehensively, and treat obfuscated builds as a different release artifact that requires its own QA lifecycle.
Aggressive algorithm: guidance and best practices
1. Overview
Aggressive Control Flow is an advanced protection mode available only in the Ultimate Edition of Skater .NET Obfuscator. It combines aggressive control-flow transformations with a selective Code Virtualization feature that extracts only small, critical fragments of selected methods and executes them from a secure cloud-backed VM at runtime.
Key constraints at a glance:
- Available only with Ultimate Edition.
- Can be applied to up to three methods per assembly (you explicitly select methods; if you select more, Skater will pick three using internal heuristics).
- Requires internet connectivity at runtime and a dependency on Skater.Cloud.Vault.
2. What the algorithm protects, and how
- Control-flow obfuscation: transforms the method(s) into a form that's hard to follow with decompilers.
- Selective Code Virtualization: instead of virtualizing an entire method, Skater extracts small, high-value code fragments (e.g., license checks, crypto primitives, proprietary algorithm kernels), encrypts them, and stores them in the Skater Cloud Vault.
- At runtime, those fragments are downloaded, decrypted and executed inside a built-in lightweight VM interpreter. The original binary no longer contains those fragments in plaintext.
Security benefits:
- Protected fragments are not visible to standard decompilers.
- Even with the full assembly, attackers cannot reconstruct full method logic easily.
- VM interpreter adds an additional layer complicating static and dynamic analysis.
3. Requirements & prerequisites
Before applying Aggressive Control Flow, ensure:
- Ultimate Edition license for Skater .NET Obfuscator.
- Method selection limit - only up to three methods per assembly may be protected by aggressive virtualization.
- Internet connectivity - assemblies protected with Aggressive must run where HTTPS access to Skater Cloud Vault is available.
- Low execution frequency - protected methods should not be called frequently; best practice is a method that runs once (e.g., at application startup). The cloud-executed fragments operate under time-limited access constraints.
- Skater.Cloud.Vault dependency - add the runtime dependency to your project (NuGet):
Skater.Cloud.Vault. - Certificate IV (Initialization Vector) - you must supply the application’s Certificate IV in the Obfuscator UI (Certificate IV field under the Aggressive Algorithm radio button). This IV uniquely ties your virtualized fragments to your project and is used to decrypt/verify fragments at runtime.
Note: Certificate IVs are unique and dynamic - they may be updated before each obfuscation run to reduce attacker advantage.
4. Code Virtualization - how it works (detailed)
- Selection: You mark methods in the UI or in an obfuscation profile.
- Analysis: Skater analyzes the chosen methods and automatically identifies small, high-value segments suitable for virtualization (you do not need to manually cut fragments).
-
Extraction & Encryption:
- Selected fragments are removed from the assembly.
- Each fragment is encrypted, digitally signed, and associated with your Certificate IV.
- Upload: Encrypted fragments are uploaded to your project area in the Skater Cloud Vault.
-
Runtime Loader: Skater injects a lightweight runtime loader into the assembly. At runtime it:
- Authenticates with the Vault (using Certificate IV and secure channel).
- Downloads, decrypts and verifies fragments.
- Executes fragments inside a built-in VM interpreter.
-
Caching & Fallback:
- The loader can cache decrypted fragments locally (encrypted) to reduce repeated downloads.
- You can define cache duration and fallback behavior (e.g., temporarily degrade functionality or block protected features) if the Vault is unreachable.
5. How to enable (step-by-step)
- Open your project in Skater .NET Obfuscator.
- Select Aggressive Control Flow as the protection algorithm.
- Mark the methods you want to protect (maximum three per assembly). If you mark more, Skater will choose three automatically.
-
In the Aggressive Algorithm options, enter your Certificate IV (obtained from your Keys Depot account / Skater Cloud Vault).
- If you need the Certificate IV: log in to your Keys Depot (the license installation guide you received at registration contains retrieval steps).
- Ensure your project references the Skater.Cloud.Vault NuGet package.
-
Run obfuscation. Skater will:
- Extract and encrypt fragments,
- Upload them to the Vault,
- Inject the virtualization runtime loader into your assembly.
6. Recommended usage & best practices
-
Choose the right methods:
- Ideal candidates are methods invoked rarely (e.g., startup license validation), not in tight loops or high-frequency hot paths.
- Protect license checks, cryptographic routines, proprietary algorithms and business-critical decision logic.
-
Limit scope:
- Because only small fragments are virtualized, you get strong protection with minimal performance impact. Still, avoid protecting methods that must run frequently.
-
Certificate IV management:
- Rotate and manage the Certificate IV securely.
- Treat the IV as a sensitive credential; store it in your key management system.
-
Network & availability planning:
- Ensure target environments have HTTPS access to Skater Cloud Vault.
- Configure cache policies so occasional Vault downtime does not break user experience.
-
Combine protections:
- Use Code Virtualization together with symbol renaming, string encryption, anti-tamper and standard control-flow obfuscation for layered defense.
-
Test thoroughly:
- Test cold start (first run - fragment download/decrypt) and warm runs (cached fragment execution).
- Test scenarios where Vault is unreachable to ensure fallback behaves as expected.
7. Performance and UX considerations
- Performance impact is minimal in most cases because only small code fragments are virtualized.
- First execution of a virtualized fragment may incur network latency for download and decryption; subsequent executions should use cached fragments (if caching is enabled).
- Design your UX so users don’t hit protected fragments in high-frequency interactions; use virtualization for rare but sensitive code paths.
8. Offline & failure modes
Skater provides caching and fallback options:
- Encrypted local cache - keep decrypted fragments cached for a configurable period.
- Graceful degradation - define what to do when Vault is unavailable (e.g., block the protected functionality, show a message, or run a reduced-capability fallback routine).
- Recommendation: implement a defensible fallback that does not leak sensitive logic, and log Vault availability issues for diagnostics.
9. Troubleshooting checklist
If protected code fails to run or behaves unexpectedly:
- Internet connectivity: Confirm the runtime environment has HTTPS access to Skater Cloud Vault.
- Certificate IV mismatch: Verify the Certificate IV entered in the obfuscator matches the one associated with the uploaded fragments.
- Missing dependency: Ensure
Skater.Cloud.Vaultis referenced in your project and present at runtime. - Execution frequency: Confirm the protected method isn’t in a tight loop - high-frequency invocation may show performance degradation.
- Cache policy: Check local cache settings - expired or invalid cache could force repeated downloads.
- Vault status: Verify Skater Cloud Vault service availability and your account permissions.
- Logs: Inspect runtime logs from the injected loader for authentication or decryption errors.
10. Limitations & important notes
- Method limit: Aggressive virtualization protects a maximum of three methods per assembly.
- Run-time internet requirement: Protected assemblies must be able to connect to the Vault (though caching mitigates short outages).
- Not a substitute for secure design: Virtualization raises the cost of reverse engineering, but it doesn’t replace secure coding, server-side enforcement of critical secrets, or proper key management.
- Certificate lifecycle: Certificate IVs may be changed frequently; plan for IV rotation in your build/deployment pipeline.
11. Quick checklist before obfuscation
- [ ] Ultimate Edition license is available.
- [ ] Chosen methods (≤ 3) are identified and marked.
- [ ]
Skater.Cloud.Vaultreferenced via NuGet. - [ ] Certificate IV fetched from Keys Depot and entered in Skater UI.
- [ ] Target runtime environment has HTTPS access to Vault (or caching strategy confirmed).
- [ ] Fallback, caching and logging behavior configured and tested.
12. When to use Code Virtualization
Use Code Virtualization when you want to:
- Protect proprietary algorithms or business logic shipped inside the client binary.
- Prevent easy reconstruction of license checks or cryptographic keys from the distributed executable.
- Retain the ability to revoke, update or replace protected fragments remotely via the cloud without shipping a new binary.
13. Example scenarios (recommended)
- License validation run at startup - virtualize the critical check fragment so attackers can’t trivially bypass activation logic.
- Proprietary algorithm kernel - virtualize the inner loop or decision tree of an algorithm rather than the whole method.
- Sensitive cryptography - virtualize key derivation or secret-handling fragments.
14. Final notes
Aggressive Control Flow + Code Virtualization is a powerful, cloud-backed technique that raises the bar for attackers by removing key fragments from the shipped binary and executing them in a protected VM context. Use it selectively (≤3 methods), manage your Certificate IV securely, ensure network availability or caching strategy, and combine with other obfuscation layers for best results.
Private Keys Depot
Rustemsoft presents a modern key management system that provides cloud data encryption approaches to secure your data keys.
What is Private Keys Depot?
Depot works by encrypting each key to help prevent unauthorized users from gaining access. Depot functions mostly as an active storage container for keys as well as an account management system for dealing with multiple privileged accounts across your company.
Skater Private Keys Depot protects cryptographic keys (that can be used as connection strings and passwords) in the cloud. When storing sensitive and business critical data, however, you must take steps to maximize the security of your Depots and the data stored in them.
We are going to provide an overview of security features and best practices for Private Keys Depot.
Private Keys Depot authentication option
When you create a Private Keys Depot within your Skater Depot license, it's automatically associated with the Registration ID of the license. All callers must register by using this Registration ID and authenticate to access the Keys Depot. Applications can access Private Keys and represents a service principal or managed identity. This identity is the most common scenario for applications that periodically need to access keys from the Keys Depot.
For this scenario to work, the Certificate IV (Initialization Vector) of the application must be specified in the access function signature and the Key Name must be specified as well.

You have ASP.NET web application that uses a symmetric encryption algorithm. How would you store the secret key and IV? Storing as a hardcoded string value in the code seems like a bad idea. How about app settings? What is the best practice? How to achieve the best result?
The Skater Private Keys Depot is a key management system. This is a software system that stores .NET applications' encryption keys and performs cryptographic operations. The Skater Private Keys Depot as encryption key management software is used to handle the administration, distribution, and storage of encryption keys. The Skater Private Keys Depot ensures encryption keys, and therefore the encryption and decryption of their sensitive information, are only accessible for approved parties. .NET software developers use these solution to ensure access to highly sensitive .NET apps information remains secured.
KeysDepot Class
Definition
Namespace: Skater.Cloud.Vault
Assembly: Skater.Cloud.Vault.dll
KeysDepot class offers a convenient interface for making calls to the Private Keys Depot. KeysDepot class is a part of Skater.Cloud.Vault namespace. The API is .NET idiomatic Client library for Rustemsoft Cloud services.
|
C#
public class KeysDepot |
Let's suggest you have the following code that updating a SQL Server table records.
string sql_Query = "UPDATE MY_TABLE SET FLAG_FIELD = 1;";
string dBConnectionString = "Persist Security Info=False; User Id=UserName; Password=SecretPassword; Initial Catalog=MY_DATABASE; Data Source = ServerName;";
using (SqlConnection conn = new SqlConnection(dBConnectionString))
{
conn.Open();
using (SqlCommand cmd = new SqlCommand(sql_Query, conn))
{
cmd.ExecuteNonQuery();
}
}
The most vulnerable element, in terms of the possibility of a hacker attack, is of course the dBConnectionString connection string.
It contains secret data about connection to SQL Server. It must be cryptographically encoded and then securely hidden by storing to
a cloud server. By using Skater Private Keys Depot you can easily accomplish that.
Suppose you have certificate IV associated with your registered Depot account CERTIFICATE_IV. To get the Certificate IV (a cryptographic initialization vector) you need to access your
online Skater Private Keys Depot account and copy the IV. Also you have previously stored the key named CONNECTION_STRING_KEY in the Keys Depot.
You stored CONNECTION_STRING_KEY Key value as
"Persist Security Info=False; User Id=UserName; Password=SecretPassword; Initial Catalog=MY_DATABASE; Data Source = ServerName;"
So the above code that updating a SQL Server table can be modified as shown below:
Skater.Cloud.Vault.DepotKey depotKey = Skater.Cloud.Vault.KeysDepot.getKey("CERTIFICATE_IV", "CONNECTION_STRING_KEY");
if (depotKey != null)
{
string sql_Query = "UPDATE MY_TABLE SET FLAG_FIELD = 1;";
string dBConnectionString = depotKey.Key; // Connection String replaced with the depot's retrieved Key
using (SqlConnection conn = new SqlConnection(dBConnectionString))
{
conn.Open();
using (SqlCommand cmd = new SqlCommand(sql_Query, conn))
{
cmd.ExecuteNonQuery();
}
}
}
Method
Description
Returns Certificate data structure object
Returns IEnumerable<DepotKey>
Returns DepotKey data structure object
Returns string result information message
Returns string result information message
Returns string result information message
Returns string result information message
Property
Description
The names must be unique and do not start with a number.
"Symmetric Block Cipher - AES-256",
"Three-Key Triple DES", or
"Hash Functions - SHA-256"
Property
Description
Also there is IList<string> collection of cryptographic algorithm names in DepotKey class. The collection is useful to specify which one of 3 types algorithm you would like to utilize for your key cryptography.
Obfuscate XAML in WPF application
When your WPF application is compiled into the build, XAMLs are converted to the BAML form of XAML.
The BAML is abbreviation for Binary Application Markup File, a compiled XAML file.
These BAML forms are stored in YourApplicationName.g.resources file. The resource file is built-in inside your compiled exe or dll.

Every WPF .NET production-quality application uses resources. A resource is any nonexecutable data that is logically deployed with an application. A resource might be displayed in an application as error messages or as part of the user interface. Resources can contain data in a number of forms, including strings, images, BAMLs, and persisted objects. A XAML file can be compiled into a .baml (Binary XAML) file, which may be inserted as a resource into a .NET Framework assembly.
At run-time, .NET Framework engine calls Application.LoadComponent() method to retrieve a XAML object instance from BAML. It extracts the .baml file from assembly resources, parses it, and creates a corresponding WPF visual tree or workflow.
Why do we need to obfuscate XAML (baml) in WPF applications?
There are special software tools that load assemblies containing BAML resources (e.g. localized resource assemblies) and show the corresponding XAML. Anybody can see your XAMLs embedded in your .NET assembly.
Linker interface
When packaging, during the assembly obfuscation, you can combine assemblies using the assembly linker. For example, instead of deploying main.dll, a.dll, and b.dll separately, you could deploy main.dll using the Assembly Linker interface that is an important feature of Skater .NET Obfuscator. The a.dll and b.dll will be joined into the main.dll

When distributing several closely related but separate DLLs is not that much of a plague, it would be a nice if, since they are so closely interlaced, you could merge these different assemblies into one. The ability to merge multiple libraries together would simplify deployment in many cases; applications that use several different languages or huge applications written in the same language but built upon many different projects would benefit from single-assembly deployment.
The Skater's special Linker interface is the utility that can link multiple modules into a single file for deployment. It does the linkage afterwards your main assembly has been obfuscated. The Linker interface intended for linking multiple managed executables or assemblies into a single module or assembly. The assigned referenced and non-referenced assemblies will be linked into your final obfuscated assembly afterwards when obfuscation is done for your current open assembly. Note The linked assemblies will not be obfuscated. Please obfuscate the joined modules before Linkage. Or you may suggest secure the combined libraries after Linkage.

Usually, if all the functionality of your distributed application is not required at once, you might want to consider having the application divided into separate modules or libraries. The .NET runtime will load each component only when a type is referenced.
On the second hand, packaging everything into a single file will bring performance improvements, mostly because the loader does not have to take the time to resolve all the dependency issues. Also, you do not have to worry about missing dlls when your application is deployed.
You can run the assemblies linkage in two different ways.
- Run Linkage and Obfuscation together
-
Linking the files first, then obfuscating them all with the "Obfuscate" button click
You need to combine all dependencies of your project into a single .NET assembly without obfuscation first. Then you will obfuscate that single big module by using pre-stored obfuscation settings. This method is much preferable. However it requires two steps to obfuscate your whole .NET compiled code. To accomplish the method please follow:- Go to the Linker tab and specify the modules to be linked together.
- Click the "Link Assemblies" button presented on the Linker tab. With these selections it will not really obfuscate anything - it will only do the linking.
- Open the new file that was generated.
- On the Options tab turn off linking and set the obfuscation types desired.
- Click the "Obfuscate" button.
Licensing
A software license is a legal instrument managing the usage or redistribution of copyright protected software.
Skater .NET Licenser is Software Authorization tool designed specifically to help secure .NET software programs and to provide license control and user validation services. You do not need to insert additional instruction/code lines into your .NET application and do not have to make a reference to an external assembly dll to implement licensing features in your .NET executable. .NET Licenser will insert the licensing subroutines and settings into your compiled .NET application bytecode. Just open your exe file in .NET Licenser interface, make licensing settings, and run Licenser. All licensing subroutines and settings added into your product will be well protected and obfuscated by using Skater .NET obfuscator techniques.
Licenser is helpful for licensing applications written in any language and designed under Microsoft .NET Framework (C#, VB.NET etc). It supports .NET (3.0 - 6) and .NET Frameworks (1.0 - 4.8).
.NET Licenser works by providing secure cryptographically encrypted license keys. This assures an easy way to activate .NET application from demo/evaluation to fully functional version. .NET Licenser uses a cryptographic encryption to generate and verify license keys.
You can choose between two ways on how to implement your application licensing by using .NET Licenser. There is .NET Licenser interface that is incorporated in Skater .NET Obfuscator and .NET Licenser API assembly that is a stand-alone .NET library.
By using Skater .NET Licenser interface you will be able to implement licensing without coding. However this way has some restrictions.
.NET Licenser API assembly gives you ability to program the licensing features in your application source code. By using .NET Licenser API you will be able bound your licensed application with user's hardware and check user PC unique code trough authentication web-service. Also by using the web-service you may block your application at user's PC if a license has been refunded by user.
Take a look at provided Licenser Sample projects to figure out how to code the licensing.
.NET Licenser interface
.NET Licenser is a functional software tool for complete license and customer management. Along with Skater .NET Obfuscator it helps you to prepare your product for protection, manage license, encrypt your code and data, send e-mails to registered customers and so on.
The Licenser tab-page is split into two panes. By using the page you able to browse Methods in the assembly structure and select/deselect them for licensing subroutine insertion process.
The right section gives you ability to adjust Licensing settings. The left section of the tab-page interface shows you structure of your assembly. You can easily change the appearance of panes.
The left section displays a hierarchical view of your assembly structure in a tree-like structure. This Tree is regarded as an object with several objects inside it, representing assembly classes and methods. Check some particular Method and it will insert the licensing subroutine into the method.

.NET Licenser: Details
Licenser interface enables you to resize each of two panes by using special center splitter. When you pass the mouse pointer over the central vertical edge, the cursor changes to indicate that the both panes can be resized.
Click once on the plus or minus icon next to a member node in the left pane tree. This action expands or collapses the member node. If no plus or minus icons appear next to a node, it means that the member node holds no objects extending beyond the level of that node.
You can see brief description of selected member in Status bar.
In the Application Title box, enter the title of your .NET application you want to be displayed in the licensing window's title bar and in messages presented on the licensing windows.
In the Purchase Link box you have to insert an internet link where your customer can make on-line order of your application. The link will be presented on the licensing windows.
You can choose between 2 different ways when your application's trial evaluation will be finished. You may specify an amount of days for the evaluation (30 days by default). Also you can select an exact date in the calendar when the licensing will start.
You can manage Registry entries of the licensing system. Encrypted installation date will be stored in Registry during your protected software first run. You can specify Registry Path where the date coded value is stored by calling Registry tree interface. The Path exists on your PC and you are not sure if it will be presented on your customer's PC. The Path you specified will be created in end-user's Registry at your application installation time. For example, you have defined the following Registry Path:
HKEY_CURRENT_USER\Software\MyApplication\
The same path will be composed at customer PC.
Enter name of Registry entry for the installation date value in the Sub Key Name box.
Registration ID number will be stored in Registry during your protected software registration/activation. You can specify Registry Path where the Registration ID number coded value is stored by calling Registry tree interface.
Enter name of Registry entry for the Registration ID value in the Sub Key Name box.
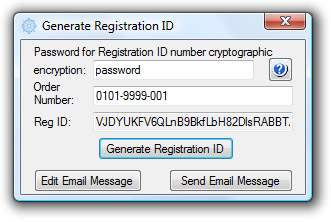
The most important part of the Registration ID interface is the 'Password for Registration ID number cryptographic encryption' box. Please insert some password that will be kept. It is important to do NOT change the password for your application. The password gives you ability to generate unique Registration ID. Other Licenser users will not be able to create right Registration ID for your application without the Password. You are licensing your application with some password and put software on the web for downloads. If you change the password you will not be able to generate correct RegID since your application is distributed with the first one.
Put your registered user Order Number into Order Number box and then push 'Generate Registration ID' button.
Note Each Order Number has to be a unique alpha-numeric combination.
You may edit e-mail message that you are going to send to your registered customer.
You can set up extended licensing settings by clicking 'More Settings' button.

When your software evaluation period expires it will show the "Evaluation stopped" form and will offer your potential customer to visit on-line purchase registration order page. You can adjust the form message. You can use [ApplicationName] keyword instead of writing down your software exact name. The keyword will be replaced with your application title on the form message.
Also you can adjust Trial Reminder Form message.
.NET Licenser is an exact software licensing tool for .NET developers who would like to:
- Protect software products from getting pirated
- Looking for easy real-time license management
- Need effective and simple software activation
.NET Licenser API assembly
.NET Licenser API assembly gives you ability to program the licensing features in your application source code. By using .NET Licenser API you will be able bound your licensed application with user's hardware and check user PC unique code trough authentication web-service. Also by using the web-service you may block your application at user's PC if a license has been refunded by user.
Take a look at provided Licenser Sample projects to figure out how to code the licensing.
.NET Licenser API assembly generates software licenses that are bound to hardware. That means, licenses are activated persistently for specific computers or work stations. Hence, the licensed software may be installed and employed solely on the registered hardware.
Software Activation is the process of generating a computer bound license key. To generate the Registration ID use Skater Licenser interface. The activation Registration ID with your user Order Number can be sent to your customer directly from you. This key enables your software and allows the user to activate his license.
From your application, the user enters the Order Number and Registration ID. Your application then calls the .NET Licenser API which sends the license key along with a computer unique identifier to the .NET Licenser Web service. The .NET Licenser Web service then generates the special record on web database where the computer unique identifier will be stored. Every time when user will start your application it will check the identifier over the internet.

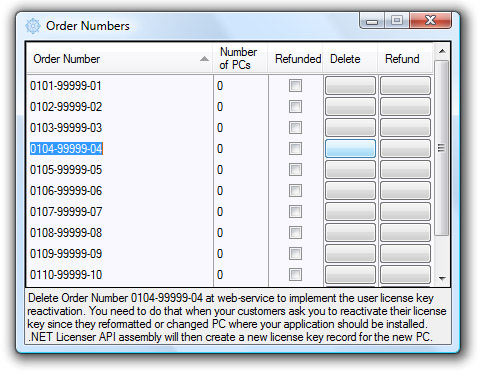
The license is tied to your user PC hardware. Swapping the hardware out invalidated your user hardware bound license key. Or user decided to transfer the license to another machine. How to reactivate the license key?
To remedy this, to implement the user license key reactivation you have to click 'Order Numbers' button in Skater Licenser interface. The Order Numbers interface will give you ability to find a specific user license key and delete it. .NET Licenser API assembly will then create a new license key record for the new PC.
.NET Licenser API assembly Overview
|
If you are developing novelty software applications with the Microsoft .NET framework, you need innovative ways to License and Protect your products. .NET Licenser API assembly is a software activation service that enables independent software vendors (ISVs) to adopt flexible licensing terms for their customers. |
|
.NET Licenser API assembly provides the interface required to implement software activation. .NET Licenser API assembly is composed of 2 components: (1) a web service that provides interface for controlling computer bound license key and (2) a client application that communicates with the web service and provides a user interface to the web service.
|
|
|
|
Software Activation is the process of generating a computer bound license key. To generate the Registration ID use Skater Licenser interface. The activation Registration ID with your user Order Number can be sent to your customer directly from you. This key enables your software and allows the user to activate his license.
|
|
NoteEach Order Number has to be a unique alpha-numeric combination.
|

|
|
From your application, the user enters the Order Number and Registration ID. Your application then calls the .NET Licenser API which sends the license key along with a computer unique identifier to the .NET Licenser Web service. The .NET Licenser Web service then generates the special record on web database where the computer unique identifier will be stored. Every time when user will start your application it will check the identifier over the internet.
|
|
|
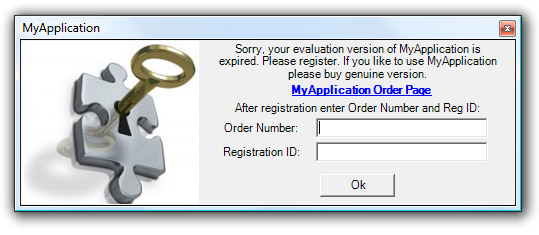
NoteIn your application, you should create an Activate License Dialog for the user to enter Order Number and Registration ID and activate it. Alternatively, you can use the .NET Licenser API sample project which provides an example how to create the dialog form for entering and processing the activation key.
|
Web Service
|
Rustemsoft LLC provides software activation and authorization web service that is installed on our internet servers. By using .NET Licenser API assembly for your application licensing you are automatically entitled to use the software activation and authorization web service. You do not need to install, manage, provide some maintenance, nor communicate somehow to the web service. All communication methods are built-in into .NET Licenser API assembly.
|
|
|
|
The web service stores records with the license key (Order Number + Registration ID) along with a computer unique identifier of every PC where your application is installed. .NET Licenser API assembly provides every installed application eligibility check by scanning the records in the web service database.
|
|
|
|
Your customers will ask you to reactivate their license keys since they reformatted or changed PC where your application should be installed. To implement the user license key reactivation you have to click 'Order Numbers' button in Skater Licenser interface.
|
|
|
The Order Numbers interface will give you ability to find a specific user license key and delete it. .NET Licenser API assembly will then create a new license key record for the new PC.
|
Implement Software Activation and Authorization using .NET Licenser API assembly
|
|
|
To activate a license key (Order Number + Registration ID), your registered user has to invoke the Activate License Dialog (within your application) which displays a license registration form that allows the user to register the license. Also it implements the license authorization by checking user's computer hardware bound code through web service.
|
|
Example:
|
|
VB.NET
|
|
' Define Licenser object to check your application activation
Dim LicenserObject As New RustemSoft.Licenser() ' Define Licenser object properties values ' Comment: That part of your code should be strictly obfuscated and encrypted by Skater technology LicenserObject.AuthorizeRegistrationID = "Trial" LicenserObject.ApplicationTitle = "MyApplication" LicenserObject.RegistryEntry_RegID = "HKEY_CURRENT_USER\Software\VB and VBA Program Settings" LicenserObject.RegistryEntry_RegID_SubKey = "SomeRegID" LicenserObject.TrialStopsByDays = True LicenserObject.TrialDays = 30 LicenserObject.TrialEndDate = New System.DateTime(2023, 2, 20) LicenserObject.RegistryEntry_InstallDate = "HKEY_CURRENT_USER\Software\VB and VBA Program Settings" LicenserObject.RegistryEntry_InstallDate_SubKey = "SomeDate" LicenserObject.ReinstallProtection = True LicenserObject.RegistryEntry_ReinstallStopMark = "HKEY_CURRENT_USER\Software\VB and VBA Program Settings" LicenserObject.RegistryEntry_ReinstallStopMark_SubKey = "SomeMark" LicenserObject.CryptographyPassword = "password" LicenserObject.CheckHardwareThruWebService = True LicenserObject.LicenseViolationMessage = "License violation!" + vbLf + "You can install " + LicenserObject.ApplicationTitle + " on one PC only." LicenserObject.RequireConnectToInternet = True LicenserObject.AllowInstallOnSecondPC = True ' Check if your application is active at the PC If Not LicenserObject.CheckActive() Then ' Some users may consider chargeback money that they spent for software license. ' To block your application at the user end you have to mark a specific license ' order number as 'Refunded' in Skater .NET Licenser interface. If LicenserObject.Refunded Then MessageBox.Show("You got refund!", LicenserObject.ApplicationTitle, MessageBoxButtons.OK, MessageBoxIcon.Stop) ' stop your application End End If ' Define your custom Trial window Dim frm As New frmTrial() ' Specify if the trial period is expired or not frm.ShowTrialMessage = LicenserObject.CheckInstallDate() ' Pop up Trial window frm.ShowDialog() ' If the trial period is expired or License violation perform an action that will stop your application If Not frm.ShowTrialMessage Or LicenserObject.LicenseViolation Then End End If End If |
|
|
|
C#
|
|
// Define Licenser object to check your application activation
{ Rustemsoft.Licenser LicenserObject = new Rustemsoft.Licenser(); // Define Licenser object properties values // Comment: That part of your code should be strictly obfuscated and encrypted by Skater technology LicenserObject.AuthorizeRegistrationID = "Trial"; LicenserObject.ApplicationTitle = "MyApplication"; LicenserObject.RegistryEntry_RegID = "HKEY_CURRENT_USER\\Software\\VB and VBA Program Settings"; LicenserObject.RegistryEntry_RegID_SubKey = "SomeRegID"; LicenserObject.TrialStopsByDays = true; LicenserObject.TrialDays = 30; LicenserObject.TrialEndDate = new System.DateTime(2023, 2, 20); LicenserObject.RegistryEntry_InstallDate = "HKEY_CURRENT_USER\\Software\\VB and VBA Program Settings"; LicenserObject.RegistryEntry_InstallDate_SubKey = "SomeDate"; LicenserObject.ReinstallProtection = true; LicenserObject.RegistryEntry_ReinstallStopMark = "HKEY_CURRENT_USER\\Software\\VB and VBA Program Settings"; LicenserObject.RegistryEntry_ReinstallStopMark_SubKey = "SomeMark"; LicenserObject.CryptographyPassword = "password"; LicenserObject.CheckHardwareThruWebService = true; LicenserObject.LicenseViolationMessage = "License violation!" + Constants.vbLf + "You can install " + LicenserObject.ApplicationTitle + " on one PC only."; LicenserObject.RequireConnectToInternet = true; LicenserObject.AllowInstallOnSecondPC = true; // Check if your application is active at the PC if (!LicenserObject.CheckActive()) { // Some users may consider chargeback money that they spent for software license. // To block your application at the user end you have to mark a specific license // order number as 'Refunded' in Skater .NET Licenser interface. if (LicenserObject.Refunded) { MessageBox.Show("You got refund!", LicenserObject.ApplicationTitle, MessageBoxButtons.OK, MessageBoxIcon.Stop); // stop your application System.Environment.Exit(0); } // Define your custom Trial window frmTrial frm = new frmTrial(); // Specify if the trial period is expired or not frm.ShowTrialMessage = LicenserObject.CheckInstallDate(); // Pop up Trial window frm.ShowDialog(); // If the trial period is expired or License violation perform an action that will stop your application if (!frm.ShowTrialMessage | LicenserObject.LicenseViolation) { System.Environment.Exit(0); } } } |
Step by Step Procedure to implement Software Activation
-
Add a Reference for Visual Studio .NET project
You are developing Visual Studio .NET application that you what to provide with the licensing, and you decide that you want to start consuming Rustemsoft LLC .NET Licenser API assembly. The first step that you will generally take is you will add a reference to the .NET Licenser API assembly, which is residing in some directory on your PC hard drive.
-
Modify your application so that you can handle the following scenario:
- If your application in the evaluation stage, you process it without activation.
- If an activation key (Order Number + Registration ID) is entered, your application through .NET Licenser API invokes the web service to record a machine bound key. Once the web service received a computer bound key, it stores it along with the registration ID in web database. When your application is started the .NET Licenser web service will validate the computer bound key. If the key validates properly, it enables your software. If it fails, it displays the 'license violation' message.
Emailing your customers
Skater Licenser provides a tool to send personalized emails to your customers. By using 'Get Registration ID' interface you can send Order Number and Registration ID to your registered user. Note that Skater .NET Licenser sends emails via your Outlook client.

Distribute your Visual Studio .Net application
Visual Studio .Net Deployment Project
To add .NET Licenser API assembly to your Visual Studio .Net deployment project, follow the steps below:
- Create a deployment project
-
Add your project's output in the File System Editor
This should detect the .NET Licenser API assembly dependencies and include the following file:
Licenser.dll
If you are not using Windows Installer to distribute your application, you need to include the following file:
Licenser.dll: not shared, to be installed in the same folder as your application
Code Extension
Skater .NET Obfuscator offers you to extend your .NET product with unneeded code classes, methods, and another elements that will confuse potential hackers by turning their attention out.
Other obfuscators' vendors offer you to compact your final .NET application to remove some unneeded elements: classes and class members. What is the compaction? You were going to use some class you have designed but for some reason you do not use it in your application code. Finally you forgot about that class. The class script is stored in your code, compiled, and actually increases your final .NET executable. The compaction removes this kind of code snippets from your final assembly. This feature is obviously for non-orderly coders.

At the same time we offer you to extend your .NET product with unneeded elements by using Skater .NET Obfuscator and we are not kidding.
Why may you need the bytecode extension?
The PC world is changed in a different way and we do not think about how to save space on our hard drive, cloud storage, git, and other media. The space is not significant now and we do not need to be worry about how to produce a much smaller application but we still need to protect our intellectual property.
As part of the complete protection of your application, it is possible to insert unneeded elements and then obfuscate them as well. It will increase your assembly final size but will give your application one more security layer. Potential hacker will be deceived seeing the plenty of obfuscated code and it will be harder to figure out what part of your secured assembly is meaningful and which is not.
For example, you may have to secure a very small application. The application has one class with a single method (function, procedure, sub etc.) inside. Let say the executable is a key that activates your licensed software you are distributing to end-users. Potential hacker intends to break and decipher the license key exe to share your software with everyone around the world for free. Since the executable is actually small in size the hacker can spend some time to successfully recover your code even it was obfuscated. We offer to extend your executable bytecode with an additional unneeded meaningless code. Then Skater will obfuscate the senseless code snippet along with the main code of your application together. It will give one more protection level.
-
To accomplish the Code Extension Skater works in the following 3 steps:
-
Combine Main executable bytecode and Extension useless code together

-
Compile the executable with the extended bytecode

-
Obfuscate the whole result executable

-
You have to follow 3 rules to write down the extension Snippet:
- The Snippet has to be a single class.
- The name of the class has to be 'Snippet'. The name will be obfuscated.
- You must be able to compile the code. Please check compilation before obfuscation.
.NET Cryptor utility
.NET Cryptor encrypts or password-protects .NET project source code files instantly. The utility prevents others from viewing and reusing your .NET source codes. Once .NET project is locked, it is completely encrypted and none of its contents can be understood.
.NET Cryptor is an indispensable security tool that protects sensitive information in your .NET source codes. In a few simple steps, .NET Cryptor encrypts your data making it practically impossible for anyone to browse and read your source code files in the event that your .NET project left at non-secure unattended PC or stolen. Also it makes sense to encrypt your entire .NET project before sending it to somebody else. Password protects, hides, and encrypts your files.
The .NET Cryptor will encrypt your .NET source code by encrypted protection technique that makes non-comprehensible the source code readability from source code thieves.
.NET Cryptor uses the Advanced Encryption Standard (AES) algorithm. It provides cryptographic secure encoding and decoding of .NET source codes.

Use .NET Cryptor!
Assembly Settings usage
The settings that you have applied for a particular assembly could be stored and reused further.
By clicking "Save Settings" button you will run the save setting interface to save the settings.

The Skater has two ways to store configuration information for assemblies.
You can store obfuscation settings by the settings name as shown above. Also the obfuscation preferences could be stored per project in the .NET project folder in a separate xml configuration file. You can call the xml pre-stored settings to apply in Skater interface by Ctrl+F3 ('Apply XML file Settings') key combination. The settings XML configuration file could be connected with your .NET project, is easy to backup, can be checked out with the project, can be shared between several users or taken to another development machine as a part of obtaining the .NET project source code from the source code repository.
The stored Settings may be used for command-line obfuscation in batch MS-DOS mode. Learn more about Skater console usage.
Integrate Skater into Visual Studio build process
In a Visual Studio Deployment project, the PreBuildEvent occurs AFTER the assemblies are built, but before the deployment/installation assemblies are created, so the command-line version of Skater should be run at this time. Do the following:
- Create an obfuscation Setting file for each of your assemblies through Skater's GUI interface. E.g., if you have two assemblies called MyFirstAssembly.exe and MySecondAssembly.exe, save them to MyFirstAssembly and MySecondAssembly respectively.
- In Visual Studio's Solution Explorer, open and click on the Deployment project you will be using to create your installation assembly(s). If there are multiple projects present, pick the first one that will be built, so any dependent assemblies don't need to run the same Skater obfuscation again.
- Move your mouse to the Properties tab (this is not the same as Right-Clicking and selecting Properties). This displays the Deployment Properties page.
- Add the following to PreBuildEvent, after you have tested the command lines outside of Visual Studio to ensure they are working correctly!
                                echo off

                                echo Obfuscating MyFirstAssembly.exe

                                "C:\Program Files\Rustemsoft LLC\Skater .NET Obfuscator\Skater.exe" MyFirstAssembly

                                echo Obfuscating MySecondAssembly.exe

                                "C:\Program Files\Rustemsoft LLC\Skater .NET Obfuscator\Skater.exe" MySecondAssembly
You can get a critical error situation during Visual Studio build process setup. Please do not take the Primary Output but just build the application separately and add the assembly to the application folder of the setup project.
There is the description how to get into the build error situation herein. You can reproduce it by following the steps below.
- Create a new web-forms project in MS Visual Studio 2005 or later, save it and build it
- Add a setup project to the solution in Visual Studio (File/Add/New Project/Other Project Types/Setup and Deployment)
- Choose the Setup Wizard template
-
Follow the steps in the wizard:
- Create a setup for a windows application
- "Which project output groups do you want to include?": check the "Primary Output from MyApp" checkbox. THIS IS CRUCIAL TO THE ISSUE.
- Add additional files if you have them
- Click Finish
- Create obfuscator settings using the Skater GUI and the assembly you did built before
- Follow the steps above in the topic on how to add an obfuscator pre-build event and add the pre-build event to the Setup project properties
- Build the setup project. Observe that the project seem to be correctly building and that there are no complains from Skater. This is because it is taking the earlier built assembly and not the assembly as it comes from the Primary Output of the VS setup project. (See 4 above).
- Deploy the project by running the generated setup.exe or MSI. What you are then actually deploying is the primary output assembly and not the obfuscated assembly!
- Check the assembly and observe that indeed no obfuscation has taken place.
Using Custom Attributes from System.Reflection namespace
The .NET Framework provides System.Reflection.ObfuscateAssemblyAttribute custom attribute designed to make it easy to automatically obfuscate assemblies without having to set up configuration files. However we recommend use the pre-stored settings that you make in Skater GUI. How can you use this attribute with Skater .NET Obfuscator? It is presumed that you are familiar with custom attributes and how to apply them in your application code.
Skater supports ObfuscateAssemblyAttribute attribute only in your assembly code.
The System.Reflection.ObfuscateAssemblyAttribute instructs Skater to use their standard obfuscation rules for the appropriate assembly type.
This attribute is used at the assembly level to tell Skater how to obfuscate the assembly as a whole. Setting the AssemblyIsPrivate property to false tells Skater to run the assembly in library mode. For this case, public types and members will not be renamed even if you assigned them in obfuscation settings. If you set it to true, Skater will not run the assembly in library mode and will rename public types and members as it is described in pre-stored obfuscation settings.
Stripping Declarative Obfuscation Attribute
Skater can strip out the obfuscation attribute when processing is complete, so your output assemblies will not contain clues about how it was obfuscated. The System.Reflection.ObfuscateAssemblyAttribute obfuscation attribute includes the Boolean StripAfterObfuscation property whose default value is false.
Example
The following code example shows a private assembly that has been marked with the ObfuscateAssemblyAttribute. The StripAfterObfuscation property is false, to prevent the Skater from stripping the attribute after processing.
using System;
using System.Reflection;
[assembly: ObfuscateAssemblyAttribute(true, StripAfterObfuscation=false)]
VB.NET
Imports System
Imports System.Reflection
<Assembly: ObfuscateAssemblyAttribute(False, StripAfterObfuscation:=False)>
System.Reflection.ObfuscateAssemblyAttribute is not supported by default. Skater gives you ability to tune up detailed settings for each element of your assembly and then re-use the settings.
Skater Watermark
|
Traditionally, a watermark was a mark or design placed on paper that was produced by the creation of a variation in the thickness of the paper. Watermarks were only visible only when the paper was held up against light. Watermarks can be used to identify the manufacturer, or the grade, of paper. Today, watermarking has gone digital. Digital watermarks can be added to image or video files, so that the information contained in the file can be identified and copyright protected [source: Britannica ]. |
|


|
Skater .NET Obfuscator provides Watermark interface. Your .NET assembly can also be watermarked.
|
|
|


|
|
|
|
|
|
You obfuscate your DLL or EXE before the product distribution so hackers won’t be able to still your source codes. However, they may use the whole distributed software product by renaming it and incorporate within their own projects. But burglars cannot remove Skater Watermark or modify it. It is not possible because Skater produce obfuscated assemblies that are not re-compileable.  |
|
Click 'LogIn On-line' link to access your personal Skater on-line account and locate the Skater Watermark generation interface as shown below.  |
|
Benefits of watermarking .NET assemblies
|
------------------------------------------------------------------------------------------------